
DIY framed world map
If you've been to our house or seen any photos taken around our table, you've seen our map. It's the centerpiece of our dining area, a great conversation starter, and educational tool.
After dreaming about a vintage pull-down school map and pricing them out with my eyes bulging out, we decided to make our own framed version like I'd seen in some Instagram photos.
It was a pretty simple process, that yielded a not-quite-perfect, but imperfectly lovely work of art.

We've started putting pins in it-- so far, they aren't to mark where we've been but rather where our friends and family live, far and wide. Right now we have pins for David's siblings and mine, missionary friends, a couple of friends who have stayed with us, and the hometowns of our (Brazilian) neighbors.
Our kids love it and one of their favorite games is to be quizzed at the dinner table-- anything from "What color is Canada on the map?" to "Where do penguins live?" It's good fun.

Here's how we made it, and how you can make one, too.
(Special thanks to my husband David for helping with this tutorial, and for making our map! I told him I'd "pay" him for his blogging time by buying him a new Dodgers hat. ;) )
Supplies
Backing- plywood or MDF, cut to size
Painted trim- we used window/door casing from Home Depot
Finishing nails, spray adhesive, construction adhesive/glue (like Liquid Nails)
1. Measure your map. We chose a laminated one and bought it at Barnes & Noble, but Amazon has a lot of choices, too. Cut your plywood or MDF backing to the same size as your map. We had our plywood backing in two pieces because of what we had on hand. Prime and paint trim if necessary (Home Depot sells it pre-primed-- that's what we got).

2. Cut trim. The trim is oversized so that it hangs over the edge of the map on all sides, so you'll want to cut each piece of trim a bit longer than the width and height of the map. Figuring the exact length requires a bit of math and is dependent on the size of your trim. **See the end of the post for the nitty-gritty math details and diagram. When you cut, make 45-degree cuts on the ends, preserving the desired length on the long side of the diagonal.
OPTIONAL: We cut a recessed groove in each trim piece to hide the backing material. Cutting the recessed groove is tricky and requires the use of a table saw or router. We used a table saw to make the two separate cuts. We cut 1" into the width of the trim and about halfway through the thickness of the trim. **See the end of the post for the nitty-gritty math details and a diagram.

3. Line cork squares up on backing and trim as necessary so that they fill the wood to the edges. Using spray adhesive, glue cork squares to plywood-- now you have a big cork board. Spray both the cork and the backing to get a better bond.

4. Spray cork board liberally with spray adhesive.

5. Carefully lay map on cork board and press down onto sprayed cork. You really have to press down and try to smooth out all the bubbles. (Ours didn't come out perfect, but we don't mind.)

6. Line up trim around map edges.

7. Glue each piece of trim (David likes to squirt the glue in a long line and then squish it with his finger before adhering the piece). Finish the frame by nailing the trim in place with short/small finishing nails (3 on the short sides, 5 on the long sides), and cover the nails with a dab of paint or putty.

You did it! Hang it up and put in some pins.
** Diagrams & Math
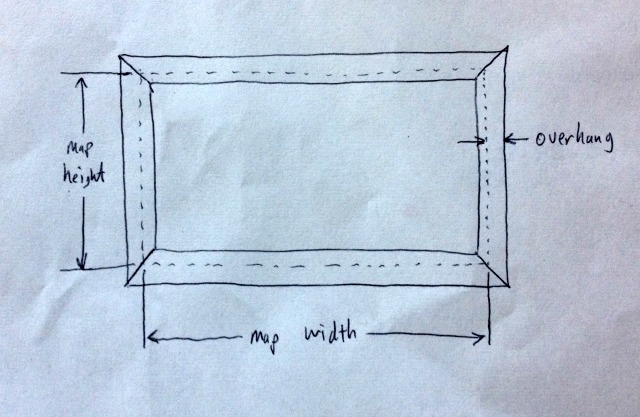
(This shows how the frame is larger than the map)
Here's the math for our trim:
Our trim was 2 1/4" wide. The recessed cutout was 1" deep - this leaves 1 1/4" of overhang beyond the map boundaries. Double the overhang value (1 1/4 x 2 = 2 1/2) and add to the dimensions of the map to determine the length of the four trim pieces. Our map was 31" x 49" so our trim pieces were 33 1/2" and 51 1/2" long.

Affiliate links included, thanks for your support.
